
TestFlight in Depth

Testing Apps with TestFlight
Help developers test beta versions of their apps and App Clips using the TestFlight app. Download TestFlight on the App Store for iPhone, iPad, Mac, and Apple TV.
Getting started
To test beta versions of apps using TestFlight, you’ll need to accept an email or public link invitation from the developer and have a device that you can use to test. You’ll be able to access the builds that the developer makes available to you.
If you’re a member of the developer’s team, the developer can give you access to all builds or certain builds.
Required platforms
iOS or iPadOS apps: iPhone, iPad, or iPod touch running iOS 13 or iPadOS 13 or later. App Clips require iOS 14 or iPadOS 14, or later.
macOS apps: Mac running macOS 12 or later.
Available languages
Arabic, Catalan, Chinese (simplified), Chinese (traditional), Croatian, Czech, Danish, Dutch, English (Australia), English (U.K.), English (U.S.), Finnish, French, French (Canada), German, Greek, Hebrew, Hindi, Hungarian, Indonesian, Italian, Japanese, Korean, Malaysian, Norwegian, Polish, Portuguese (Brazil), Portuguese (Portugal), Romanian, Russian, Slovak, Spanish, Spanish (Latin America), Swedish, Thai, Turkish, Ukrainian, and Vietnamese.
Installing and testing beta apps
Each build is available to test for up to 90 days, starting from the day the developer uploads their build. You can see how many days you have left for testing under the app name in TestFlight. TestFlight will notify you each time a new build is available and will include instructions on what you need to test. Alternatively, with TestFlight 3 or later, you can turn on automatic updates to have the latest beta builds install automatically.
When the testing period is over, you'll no longer be able to open the beta build. To install the App Store version of the app, download or purchase the app from the App Store. In-app purchases are free only during beta testing, and any in-app purchases made during testing will not carry over to App Store versions.
Installation
To get started, install TestFlight on the device you’ll use for testing. Then, accept your email invitation or follow the public link invitation to install the beta app. You can install the beta app on up to 30 devices.
Installing a beta iOS or iPadOS app via email or public link invitation
Install TestFlight on the iOS or iPadOS device that you’ll use for testing.
Open your email invitation or tap the public link on your device.
When installing via email invitation, tap “View in TestFlight” or “Start testing” then tap “Install” or “Update” for the app you want to test.
When installing via public link, tap “Install” or “Update”.
Installing a beta macOS app via email or public link invitation
Install TestFlight on the Mac that you’ll use for testing.
Open your email invitation or click the public link on your Mac.
When installing via email invitation, click “View in TestFlight” or “Start testing” then click “Install” or “Update” for the app you want to test.
When installing via public link, click “Install” or “Update”.
Adding Internal Test Users
Create a group and add up to 100 internal testers (App Store Connect users with access to your content) to test your app using TestFlight beta testing. You can choose to automatically distribute builds to internal groups or add them manually. Builds created by Xcode Cloud always need to be manually added to groups in App Store Connect.
Required role: Account Holder, Admin, App Manager, Developer, or Marketing. See Role permissions.
Create an Internal Test group
From My Apps, select your app.
Click the TestFlight tab.
In the sidebar, click the Add button (+) next to Internal Testing.
In the dialog that appears, enter the name for a new internal group, then click Create. You can change the name later, if needed.
Select the “Enable automatic distribution” checkbox to allow Xcode to automatically deliver builds to everyone in the group. If automatic distribution is not enabled, all builds must be manually added to the group. Builds created by Xcode Cloud always need to be manually added to groups in App Store Connect.
Add internal testers to a group
From My Apps, select your app.
Click the TestFlight tab.
In the sidebar, click the Add button (+) next to Internal Testing.
Next to Testers, click the Add button (+).
Users that are eligible to be internal testers appear in a dialog.
Note: If a user you want to add doesn’t appear, change their user role.
Select the checkbox next to each user you want to invite, then click Add.
If you have builds available for testing, the users you select will receive an email inviting them to test the app. They’ll be directed to accept the invitation using theTestFlight app on their device or via a redemption code. Internal testers can download and test all builds for 90 days.
Add builds to a group
From My Apps, select your app.
Click the TestFlight tab.
In the sidebar, click the group you want to add a build to.
On the right, click the Add button (+) next to Builds.
Select the build you want to add to the group, then click Next.
Enter the What to Test information and optionally enter localized versions of test information in the fields under each language-specific section.
Note: This information will be available to testers in all groups that have access to the build.
Click Add.
If you have builds available for testing, the users you selected will receive an email inviting them to test the app. The users will be directed to accept the invitation using the TestFlight app on their device or via a redemption code. Internal testers will be able to download and test all builds for 90 days.
Invite external testers
You can invite external testers (persons outside your team) to test your app using TestFlight beta testing once you’ve uploaded at least one build. To make your build available for external testing, create a group, add builds, and then invite testers using their email address or by sharing a public invitation link.
Required role: Account Holder, Admin, or App Manager. See Role permissions.
Create a group
From My Apps, select your app.
Click the TestFlight tab.
In the sidebar, click the Add button (+) next to External Testing to add a new group.
In the dialog that appears, enter a group name, then click Create.
Later, you can change the name of the group if needed.
Add builds to a group
From My Apps, select your app.
Click the TestFlight tab.
In the sidebar, under External Testing, select the group you want to add builds to.
On the right, click the Add button (+) next to Builds.
In the build dialog, select the platform and version from the pop-up menus.
From the table, select a build, then click Next.
Although you can add only one build at a time, you can add additional builds later.
Note: Enter test information such as Feedback Email and Contact Information if these details have not yet been provided in the Test information dialog.
In the What to Test dialog, enter what you want testers to focus on.
Optionally, enter localized versions of testing information in the text fields under each language-specific section.
Optionally, select “Automatically notify testers.”
If you leave this checkbox deselected, you will have to manually distribute the build to testers after it's approved by TestFlight App Review later.
Depending on the status of the build, click either Submit Review or Start Testing.
You can only have one build of each version in review at a time. Once that build is approved, you can submit additional builds.
After you submit your build to TestFlight App Review, Apple reviews the build and the accompanying metadata. The first build you submit requires a full review, but later builds for the same version may not.
If Apple approves your build for TestFlight beta testing, users on the App Store Connect account with the Admin role will receive an email notifying them of the approval.
If Apple rejects your build or metadata, the external status will be Rejected and you can click status to see rejection details.
Note: Submitting a build to TestFlight App Review doesn’t submit it to App Review for sale in the App Store.
Invite external testers
Once you have builds available to test, and you've added them to a group, you can invite testers.
From My Apps, select your app.
Click the TestFlight tab.
In the sidebar, under Testers & Groups, select a group.
You can Invite testers using a public link, email, or both.
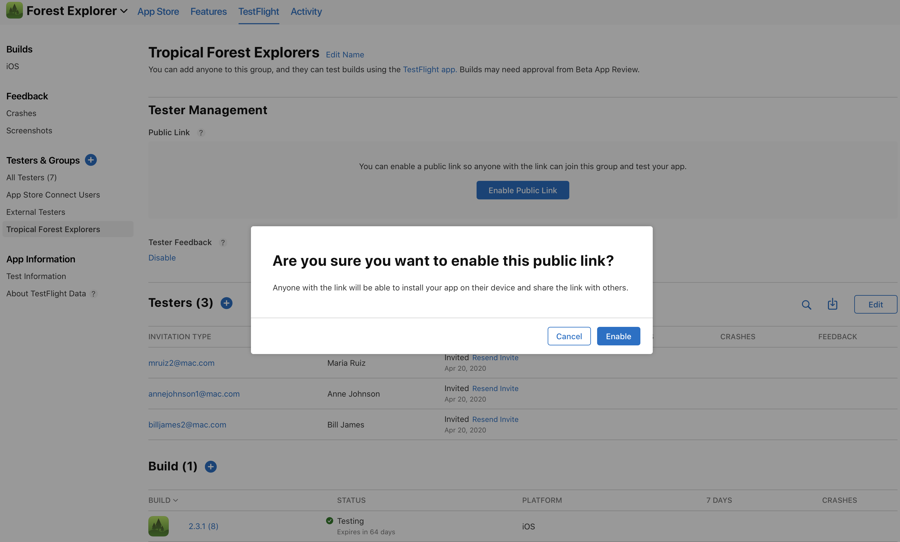
To invite testers using a public link:
1. Click Enable Public Link, and confirm in the dialog that appears.
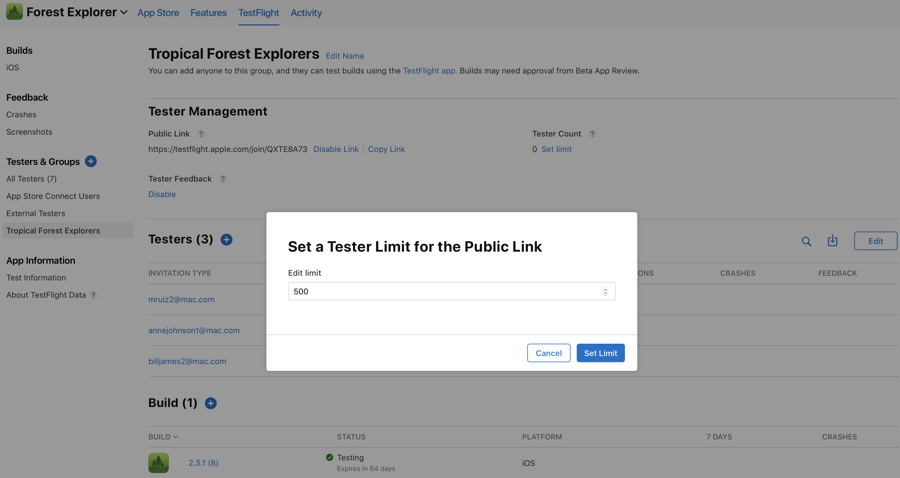
2. Under Tester Count, click Set Limit to limit the number of testers that can join this testing group using the public link. Enter a number between 1 and 10,000.
3. Copy the link, and share it using social media, messages, email, or other channel.
Keep in mind that anyone can share this link, so testers may be able to join your testing group even if you don't invite them directly. If a tester joins your group using a public link, their name and email will not be displayed in the Testers section in App Store Connect (it will display as anonymous), but you will be able to see their installation date, sessions, and crashes. You can disable the public link at any time.
To invite testers using their email address:
1. Click the Add button (+) next to Testers.
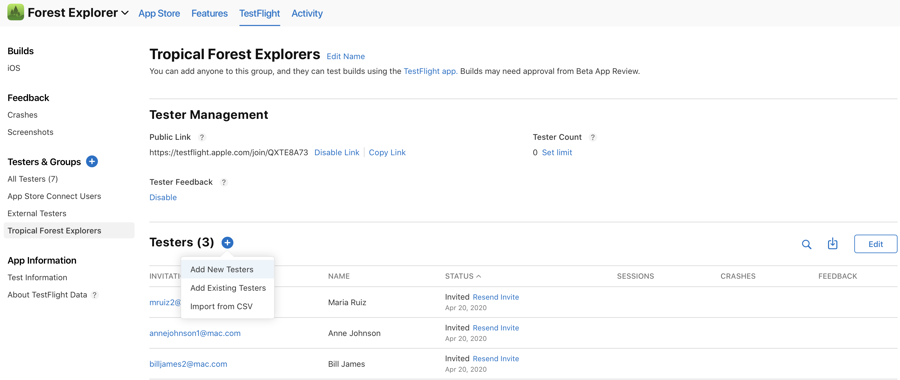
2. In the pop-up menu that appears, choose an option. You can add new testers using their emails address, existing testers you've previously added, or import testers from a CSV file.
3. Testers you invite will get an invitation email to start testing. If a tester accepts an email invitation, their name, email address, installation date, sessions, and crashes, will display in the Testers section in App Store Connect.
Notify external testers after your build is approved
If you didn’t select “Automatically notify testers” when you added your build to your group, you must manually notify testers when your build is approved.
From My Apps, select your app.
Click the TestFlight tab.
In the sidebar, under Builds, click the platform for your app (iOS or tvOS).
Choose a version, then under Status, click Notify Testers for the build row.
The build status changes to Testing. The external testers will receive a notification directing them to accept the invitation using the TestFlight app on their device.
Remove a build from a group
From My Apps, select your app.
Click the TestFlight tab.
In the sidebar, under Testers &Groups, select a group.
On the right, under Builds, hover over the build you want to remove.
Click the delete button.
In the dialog that appears, confirm you want to remove the build from the group and click Remove.
If you want to remove a build from testing for all your testers, go to Stop testing a build.
Managing automatic updates
After installing TestFlight 3 or later for iOS, iPadOS, or tvOS, or TestFlight for macOS, you’ll be prompted to turn on automatic updates. This allows the latest available beta builds to install automatically. TestFlight will notify you each time a new build is installed on your device. Automatic updates can be turned off at any time.
Use TestFlight to change automatic update settings for all of the beta apps you’re testing:
Note: This setting will apply to all new beta app builds. Beta apps that have automatic updates set at the individual app level won't be affected
TestFlight for iOS or iPadOS
Open TestFlight and tap Settings in the top right.
Tap Automatic Updates.
Tap On or Off.
TestFlight for macOS
Open TestFlight and choose Preferences from the TestFlight menu.
Under General, select Automatic Updates for New Apps.
Use TestFlight to change automatic update settings for individual beta apps you’re testing:
TestFlight for iOS or iPadOS
Open TestFlight and go to the app’s page.
Under App Information, turn Automatic Updates On or Off.
TestFlight for macOS
Open TestFlight and go to the app’s page.
Under App Settings, select Automatic Updates.
Testing builds from previous versions and build groups
When viewing an app in TestFlight, you'll see the latest available build by default. You can still test all other builds that are available to you.
If you already have the App Store version of the app installed on your device, the beta version of the app will replace it. After you download the beta app, you’ll see an orange dot next to its name that identifies it as a beta.
When you accept a TestFlight invitation through a public link, your name and email address aren’t visible to the developer. However, they’ll be able to see your number of sessions and crashes, the day you installed their app, and the latest installed version.
TestFlight for iOS and iPadOS
Open TestFlight and go to the app’s page.
Tap View Previous Builds or, if you're using Xcode Cloud, tap Versions and Build Groups.
Tap either the Versions tab or Build Groups tab, then tap and install the build you want to test. The build you choose will replace what's currently installed.
TestFlight for macOS
Open TestFlight and go to the app’s page.
Next to Build Information, click View Previous Builds or, if you're using Xcode Cloud, click Versions and Build Groups.
Click either the Versions or Build Groups tab, then select and install the build you want to test. The build you choose will replace what’s currently installed.
Giving feedback
While testing a beta version of an app or App Clip, you can send the developer feedback about issues you experience, or make suggestions for improvements based on the “What to Test” content. Feedback you submit through TestFlight is also provided to Apple as part of the TestFlight service.
Get feedback on your iOS, iPadOS, or macOS apps
You can send feedback through the TestFlight app or directly from the beta app or beta App Clip by taking a screenshot, and you can report a crash after it occurs. If you were invited to test an app with a public link, you can choose not to provide your email address or other personal information to the developer. Apple will also receive all feedback you submit and will be able to tie it to your Apple ID.
Sending feedback through the TestFlight app
For iOS or iPadOS:
Open the TestFlight app on your device.
From the Apps list, tap the app.
Tap Send Beta Feedback.
In the share dialog, tap Include Screenshot to choose a screenshot. If you don’t want to send an attachment, tap Don't Include Screenshot.
Add your comments (up to 4,000 characters), and optionally enter your email address if you were invited with a public link.
Tap Submit.
For iOS 12.4 or earlier:
If your device is running iOS 12.4 or earlier, tap Send Beta Feedback to compose an email to the developer. The feedback email contains detailed information about the beta app and about your iOS device. You can also provide additional information, such as necessary screenshots and steps required to reproduce any issues. Your email address will be visible to the developer when you send email feedback through the TestFlight app even if you were invited through a public link.
For macOS:
Open the TestFlight app on your Mac.
From the Apps list in the sidebar, select the app you want to send feedback for.
Click Send Beta Feedback.
In the feedback dialog that appears, add your comments (up to 4,000 characters), and optionally enter your email address if you were invited with a public link.
Optionally, attach a screenshot by clicking Attach Screenshot.
Click Submit.
Note: You can drag and drop screenshots into the feedback text field.
Sending feedback through the app
When you take a screenshot while testing a beta app or beta App Clip, you can send the screenshot with feedback directly to the developer without leaving the app or App Clip Experience. Developers can opt out of receiving this type of feedback, so this option is only available if the developer has it enabled.
For iOS or iPadOS:
Take a screenshot on your device. For details on how to take screenshots, see Take a screenshot on your iPhone, Take a screenshot on your iPad, and Take a screenshot on your iPod touch.
A thumbnail of your screenshot appears in the lower-left corner of your device. Tap the thumbnail and, if needed, add drawings and text with Markup. Then tap Done.
Tap Share Beta Feedback.
Optionally, you can add comments (up to 4,000 characters), and your email address if you were invited with a public link.
Tap Submit.
For macOS:
Take a screenshot on your Mac. For details on how to take screenshots, visit Take a screenshot on your Mac
A thumbnail of your screenshot appears in the lower-right corner of your Mac. Click the thumbnail to open the Quick Look window and, if needed, add drawings and text with Markup.
From the Share menu in the Quick Look window, click Send Beta Feedback.
Optionally, you can add comments (up to 4,000 characters), and your email address if you were invited with a public link.
Click Submit.
Sending crash information
If you experience a crash while testing a beta app or beta App Clip, you’ll receive an alert asking if you want to send crash details to the developer through TestFlight. Developers can opt out of receiving this type of feedback, so this option is only available if the developer has it enabled.
When a crash alert displays for TestFlight for iOS or iPadOS, tap Share, add any additional comments, then tap Submit.
When a crash alert displays for TestFlight for macOS, click Report, add any additional comments, then click OK, Send, or Reopen.
tvOS apps
To provide feedback on a tvOS app, open TestFlight, go to app’s page, go to the Information section to view the developer's email address, and send them an email. Provide as much information as you can, including screenshots and steps required to reproduce any issues you encountered. Please note that your email address will be visible to the developer when you send email feedback through TestFlight.
Contacting the developer
If you need to contact the developer while you’re testing their beta app for reasons other than feedback, you can view their email address. In TestFlight, go to the app’s page, go to the Information section, and tap App Details to view the developer’s email address.
Opting out from testing
If you don’t accept your email invitation, the beta app will not be installed and Apple will not send you any further communications regarding testing. If you accepted the invitation but no longer wish to test the app, you can delete yourself as a tester on the app’s Information page in TestFlight by tapping Stop Testing. Alternatively, you can email the developer to ask them to remove you by clicking the Unsubscribe link at the bottom of a TestFlight build notification email.
Your Privacy and Data
When you test beta apps or beta App Clips with TestFlight, Apple will collect and send crash logs, your personal information such as name and email address, usage information, and any feedback you submit to the developer. Information that is emailed to the developer directly is not shared with Apple. The developer is permitted to use this information only to improve their app and is not permitted to share it with a third party. Apple may use this information to improve the TestFlight app.
Apple retains TestFlight data for one year. To view and manage your data with Apple, including your data that is sent to Apple through TestFlight, visit Data and Privacy. For more information about how the developer handles your data, consult their privacy policy. To request access to or deletion of your TestFlight data, contact the developer directly.
Information shared by using TestFlight
The following data is collected by Apple and shared with the developer when you use TestFlight. If you accepted an invitation through a public link only, your email address and name are not visible to the developer.
Email Address
The email address with which you were invited to test the app. This may or may not be the same as the Apple ID associated with your device. If you were invited with a public link, your email address is not shared with the developer.
Name
Your first and last name as entered by the developer when they invited you to test the app using your email address. If you were invited with a public link, your name is not shared with the developer.
Invitation Type
Whether you were invited by email or through a public link.
Status
The status of your invitation: Invited, Accepted, or Installed. This status is refreshed when you accept or install a beta build.
Installs
The number of times you've installed a beta build.
Sessions
The number of times you've used a beta build.
Crashes
The number of crashes per beta build.
Data shared when sending feedback
When you send feedback through TestFlight or send crash reports or screenshots from the beta app, the following additional information is shared. This information is collected by Apple and shared with developers. Apple retains the data for one year.
App Name
The name of the app you are testing.
App Version
The most recent version and build that you have access to. This is the number that displays under the app name in the list of apps in TestFlight.
Installed App Version
The version and build you have installed on your device.
Device
The model of your device.
iOS Version
The version of iOS your device is running.
macOS Version
The version of macOS your device is running.
Language
Your device language.
Carrier
Your wireless service provider.
Time Zone
The time zone your device is set to.
Architecture
The type of Central Processing Unit (CPU) for your device.
Connection Type
Whether you were connected to Wi-Fi, cellular, or not connected at the time that the feedback was sent, and your network type.
Paired Apple Watch
The model and watchOS version of the paired Apple Watch, if applicable.
Screenshots
The screenshots you shared when providing feedback.
Comments
The comments you shared when providing feedback.
App Uptime
The length of time the app was open and running at the time the feedback was sent.
Disk Free
The amount of disk space you had available when you sent feedback.
Battery
Your battery level at the time the feedback was sent.
Screen Resolution
The screen resolution of your device.
Crash Logs
Symbolicated crash logs. This includes information about how long the app was running before it crashed.
Copyright © 2022 Apple Inc. All rights reserved.Terms of Service Privacy Policy
Last updated
Was this helpful?