TestFlight beta testing lets you distribute beta builds of your app to testers and collect feedback. You can enable TestFlight beta testing for up to 100 apps at one time in your App Store Connect account. Learn more.
Make improvements to your app and continue distributing builds until all issues are resolved before you submit your app to the App Store.
Enter test information about your app, such as a description and feedback email. You will need this if you plan to distribute your build to external testers (persons outside your team).
. Read Cryptography and U.S. Export Compliance to determine if you need to for your app. After builds are uploaded, they are available for testing for 90 days.
You can for internal and external testers, then assign specific builds to them. After you've added builds to a group, you can add (up to 10,000 people) and (up to 100 App Store Connect users with access to your content) to test your app. If you invite external testers, the build needs to be approved by before testing can begin.
Testers install the free app on their devices. Then they use their invitation email or a public link to accept invitations, install your app, send feedback, and get updates. Testers download and install thinned variants of your app.
Track your tester engagement and your app’s performance by in App Store Connect—such as numbers of sessions and crashes. You can also resend email invitations to testers who have not yet accepted their invitation.
Testers running TestFlight for iOS, version 2.3 or later and iOS 13 or iPadOS 13 or later, can send feedback through the TestFlight app or directly from your beta app by taking a screenshot. This is also available in TestFlight for Mac. You can view this in the Feedback section in App Store Connect. Testers running tvOS or earlier versions of iOS can send feedback to the email address you specified in step 1.
When you are done testing, you can optionally to stop testing it, and then go to for the process of submitting your app to the App Store. If you don’t expire your build and submit it to the App Store, testers that have received an invite to test will still be able to test your build even after it goes live on the App Store. Your build will become unavailable in TestFlight after 90 days.
To make your beta builds available to members of your App Store Connect team, your app doesn’t need review by TestFlight App Review. To make your beta builds available to external users, your beta build may require review. When you add the first build of your app to a group, the build gets sent to TestFlight App Review to make sure it follows the . A review is only required for the first build of a version and subsequent builds may not need a full review. Testing can begin once a build is approved.
How to publish your Thunkable Project to the Apple App Store
Publishing your app to the App Store can be a rewarding process.
Apple requires a lot information for apps that are available in their App Store. As a result, the publishing process can feel long and will require at least 20 minutes to complete the necessary steps on the Thunkable website, which currently requires information from 4 different Apple websites. We recommend completing the Prepare for Submission steps before starting the publishing process in Thunkable.
Thunkable is continually looking for ways to streamline the publishing process and has made it possible for creators to publish from a non-Mac computer, which is normally required by the standard publishing process.
In this document, the version of your app that you submit to the App Store is referred to as a build.
Apple holds a high standard for apps that are approved for distribution in the App Store so please to make sure your app is in compliance before you sign up for the Apple Developer Program
You will need to set a version number in your project. You can set your version number in the under iOS > Version Number.
If this is your first time sending this app to App Store Connect, you can set the version number to 1. You will need to increment your version number, or increase it by 1, every time you submit a build to App Store Connect.
Apple requires that you explain to users why you may need access to sensitive services like a camera, photo library and microphone. You can add these explanations in the under iOS Permissions.
User Tracking If your app shares trackable data with any third parties, you must tell your end user what data is being shared and why. This should be left blank if no trackable data is shared with third parties.
To learn more about when to include a tracking string,
You will need an Apple Developer Account to publish an app to the App Store. To obtain a developer account you must enroll in the . An Apple Developer Account costs $99/year.
If a developer uses a third-party platform like Thunkable to send an app build to App Store Connect, the developer needs to create an app-specific password.
You only need one app-specific password for Thunkable to send any build to App Store Connect on your behalf.
You do not need separate app-specific passwords for separate Thunkable projects.
You will need this password to send a new build to your App Store listing in the future, so make sure to record it securely.
Go to the and create an app-specific password.
Step 1: Enter your Apple ID and Password
Step 2: If prompted, enter your 6 digit authentication code.
Step 3: Once signed in, click on the Generate password... link highlighted above.
To change an app-specific password, you will need to revoke your old password and generate a new password using the steps above. To revoke an app-specific password:
Sign into your
In the Security section, click Edit
Go to the App-Specific Passwords section and click View History
Every app published on the App Store must have a unique name. For example, there can only ever be one app called Thunkable Sample App. You can Register your App ID to reserve the name you want!
Go to the to register a new App ID. Click through the tabs below to see each screen in the ID creation process.
Step 6 in the tabs below shows you where to find your App Name, Team ID, and Bundle ID.
App Name: The app Name must be unique to the App Store and is what appears next to the app icon when it is downloaded on a user's phone.
Team ID: A unique account identifier that is linked to your Apple Developer Program membership. Apple will automatically create this for you, and it can be used for every app you publish.
Bundle ID: Also unique to your app, but not visible to your app users. Otherwise, a single Explicit App ID should work. Apple recommends reversing your domain name to create your bundle ID i.e. com.yourDomainName.yourAppName to avoid conflicts with other apps.
Open your Apple Developer account page and choose the Certificates, IDs & Profiles option from the menu on the left hand side of the screen.
From the menu on the left, click on the Identifiers menu item
Click on the blue + icon to add a new ID to your account.
Once you have registered an App ID, you can create an app listing on App Store Connect. This is where you will manage your submission to the App Store.
Go to the and follow the steps below to create your App Store listing with the App Name and Bundle ID you registered earlier.
Click My Apps to create a new app and to manage your existing apps.
Click the blue + button to create a new app
You will need to use the same App Name and Bundle ID you registered earlier. If you registered an 'Explicit App ID', you will enter it into the Bundle ID field above.
Now click on your app name to prepare your store listing.
Thunkable enables you to send your build directly to the App Store without the need for any specialized software or hardware. To begin the process, click on the Publish icon and choose Publish iOS from the drop-down menu.
A publishing dialog will pop up to guide you through the publication process. Please take a moment to read all the instructions.
Click the Get Started button to proceed.
Enter the Apple ID that is associated with your . Click the Next button to proceed.
If you did not register an App ID before getting started, now is the time to do so.
In the next tab, you will be prompted for your App Name, Team ID and Bundle ID. If you are unsure of what these are, please refer , above.
This step should only need to occur once. Although you need a different provisioning file for each project, your Account Certificate should remain the same between any projects published with Thunkable. Once you issue a new certificate, that will be good for a period of 1 year from the date of creation. You should be able to publish as many apps as you want with that 1 distribution certificate for you (the publisher) and 1 provisioning file per app (per published Thunkable project) A certificate is specific to the email account that was used to create the certificate. I.E. If you are helping another Thunker publish their app, you would need to log in and publish from that users account using their certificate.
Two-factor authentication helps to keep your account secure and Apple has made it mandatory for new developers to turn two-factor authentication on. If you do have 2FA turned on, you'll need to complete the following steps to confirm your identity with Apple.
In the publishing dialog, click the link that says Click to Download CSR. This is your Certificate Signing Request file and you will need it to generate an iOS Distribution Certificate.
Go to the in your Apple Developer account to generate an iOS Distribution Certificate.
You may already have an account certificate in your account. You can only have two certificates per account so you may need to revoke a certificate before you can create a new one.
Click on the blue + icon to create a new iOS distribution certificate.
Choose iOS Distribution (App Store and Ad Hoc) from the next list and click Continue.
Upload the you download from Thunkable and click Continue to get your certificate.
Provisioning profiles are required by Apple to install an app on a device. You need to create a .mobileprovision file in your Apple account and then return to Thunkable to upload this file.
Open up the in your Apple Developer account and click the blue + button to get started.
Make sure you are creating a Distribution profile and that the App Store option (highlighted above) is selected. Click Continue to choose an App ID.
From the drop down menu, choose the ID for the app that you are trying to publish. Click Continue to go to the next page.
Back in Thunkable, upload your .mobileprovision file and click the Next button to proceed.
Paste your into the empty text box and click the Next button to proceed.
If you did not create an app listing on App Store Connect before getting started, now is the time to do so.
You're almost there! Review your app icon and your Build Number and Version Number.
App icon: This app icon appears when a user downloads your app from the App Store. Our recommended size is 192 x 192 px. This icon must not have any transparent pixels.
Build and Version Numbers: The version number is visible to your users when they download a new version of your app. The build number needs to increase with each version and is only visible to you. You can opt to let Thunkable automatically increment your build and version numbers.
You should shortly receive an email from Thunkable to let you know that your build is being sent to the App Store. There are still a number of steps that you need to complete on App Store Connect before your app can be published, but that's everything completed from the Thunkable side of things - congrats!
You will need to provide some information to Apple about your app before it can be reviewed and published.
You should receive an email from Apple that says your app is ready in the App Store Connect website. This may take up to an hour.
To view your build:
Go to your App Store Connect dashboard
Select the app listing of the build you have just uploaded
You will see the app listing homepage. This page contains the tabs App Store, Features and TestFlight.
If your build is submitted successfully, it should appear under the TestFlight tab in this app listing homepage. is a tool from Apple that allows you to test your app before it is submitted for release in the App Store.
(If there are any issues, you’ll get an email from us telling you what you’ll need to fix.)
Back in the App Store tab, scroll down to the section titled Build and click the button that says Select a build before you submit your app.
You will see a dialog that allows you to select a build to attach to this app listing. Select your chosen build and click Done.
Now you can review the App Information included in your App Store tab. You can review Apple's advice on filling in your app information on .
Set a price point for your app. Apps can also be distributed for free.
The final section requires screenshots for both iPhone and iPad and a high resolution icon.
The high resolution icon will be featured in the App Store listing and must be 1024 x 1024 px with no transparency. To generate this icon, we recommend a tool .
You can see the screenshots you need in Apple's .
You may need to answer a question about export compliance. Select Yes when asked if your app uses encryption.
After submitting your app for review, you may asked, "Does this app use the Advertising Identifier (IDFA)?"
The app will still be able to be published but you will want to check the following three boxes:
Note, you should not check the box labeled Serve advertisements within the app.
Now your app listing is ready for Apple to review!
To update an existing App Store listing, follow the instructions on Apple's website .
For Step 6, Upload your new build to App Store Connect, follow the instructions in .
You do not see your app uploaded to App Store Connect
Download. One way to check if your app is build-able is to download it to your phone first. Two common download errors are:
You uploaded an icon that has the same name as an existing asset that you have uploaded
Your app icon is not an image file
Your app on iOS is inaccessible and your end user sees an error screen saying your app is unavailable.
You switched to the Free plan.
Your App (Bundle) ID doesn't match your Active Bundle ID and you may need to enable it in your Account Settings before the app can be used.
Go to the to see your published Bundle IDs. You will see how many published apps you have available and be able to select which published app you wish to keep active.
To publish an app to the App Store that contains Push Notifications, you need to:
send an app that does not contain Push Notifications to App Store Connect
add push notifications to your app project ()
send the new version of your app to App Store Connect
Between sending these two versions of your app to App Store Connect, you will need to create a new .mobileprovision file. Here's a quick overview of what that process looks like.
Click on Provisioning Profiles > All to see your current iOS provisioning profiles. Notice that the app you just created is now invalid so we need to generate a new one.
Open the inactive profile and click on Edit to generate a new one.
Scroll to the bottom of the page and click Generate.
On the next screen, click the Download button and the .mobileprovision file will be saved to your downloads folder.
If you want to remove your apps from being listed in the App Store, open your app listing on and follow these instructions:
On the “App Store” tab, click on “Pricing and Availability”
Click the “Remove from Sale” radio button
Then click the “Save” button to unpublish your app
You can see these buttons in the screenshot below:
Please note that if your Apple Developer account expires, your apps will no longer be available for download in the App Store.
Removing your app from the Play Store will not delete it from devices which have previously downloaded the app.
Step 4: Give your password a meaningful name so you will be able to recognise it later.
Step 5: You will not be able to retrieve this password once you click Done so make sure you save it some place safe.
Note: Starting June 16, 2020, uploading apps to the App Store requires an explicit bundle ID. Wildcard bundle IDs are no longer available when creating app records.
Choose App IDs from the list of options and then click on the blue Continue button to go to the next screen.
For the app Description enter the name you want to give your app and for the Bundle ID enter the bundle ID from your Thunkable project settings. Click Continue to review these details.
Once you are happy with these detail, click Register to confirm your app ID.
This new app ID is added to your list of app IDs.
Click the blue Download button to save a copy of this certificate to your computer.
Back in Thunkable, click the Upload Certificate button and choose the .cer file that you have just created.
Choose a certificate and click Continue.
Finally, give your provisioning profile a meaningful name and hit the Generate button.
Once the provisioning profile has been generated you can then Download it to your computer.
The profile has a .mobileprovisionfile type. You now need to go back to Thunkable and upload this file.
Membership. To publish to the App Store, you'll need to sign up for Apple Developer Program Membership. This currently costs $99 / year.
App Store Connect. Make sure to follow this step on creating a new app on iTunes Connect
Certificates. If you have an existing Apple Developer Program account with 2 iOS certificates, you'll have to revoke one. Apple only allows developers to have 2 iOS certificates at a time and Thunkable creates one when it publishes to your account
Provisioning profile. After you revoke your certificate, it is possible that one or more of your provisioning profiles will become inactive. To publish successfully, you'll also need to delete any inactive provisioning profiles
Login. Apple ID or password were entered incorrectly. Since we don't store either one, there's no easy way for us to check so enter it slowly
Apple ID and privacy terms. You must accept Apple's new Apple ID and privacy terms.
You see a message saying "ITMS-90809: Deprecated API Usage - Apple will stop accepting submissions of apps that use UIWebView APIs". This is a warning, but you can still publish your app. See the Web Viewer documentation for more details.


Help developers test beta versions of their apps and App Clips using the TestFlight app. Download TestFlight on the App Store for iPhone, iPad, Mac, and Apple TV.
To test beta versions of apps using TestFlight, you’ll need to accept an email or public link invitation from the developer and have a device that you can use to test. You’ll be able to access the builds that the developer makes available to you.
If you’re a member of the developer’s team, the developer can give you access to all builds or certain builds.
iOS or iPadOS apps: iPhone, iPad, or iPod touch running iOS 13 or iPadOS 13 or later. App Clips require iOS 14 or iPadOS 14, or later.
macOS apps: Mac running macOS 12 or later.
Arabic, Catalan, Chinese (simplified), Chinese (traditional), Croatian, Czech, Danish, Dutch, English (Australia), English (U.K.), English (U.S.), Finnish, French, French (Canada), German, Greek, Hebrew, Hindi, Hungarian, Indonesian, Italian, Japanese, Korean, Malaysian, Norwegian, Polish, Portuguese (Brazil), Portuguese (Portugal), Romanian, Russian, Slovak, Spanish, Spanish (Latin America), Swedish, Thai, Turkish, Ukrainian, and Vietnamese.
Each build is available to test for up to 90 days, starting from the day the developer uploads their build. You can see how many days you have left for testing under the app name in TestFlight. TestFlight will notify you each time a new build is available and will include instructions on what you need to test. Alternatively, with TestFlight 3 or later, you can turn on automatic updates to have the latest beta builds install automatically.
When the testing period is over, you'll no longer be able to open the beta build. To install the App Store version of the app, download or purchase the app from the App Store. In-app purchases are free only during beta testing, and any in-app purchases made during testing will not carry over to App Store versions.
To get started, install TestFlight on the device you’ll use for testing. Then, accept your email invitation or follow the public link invitation to install the beta app. You can install the beta app on up to 30 devices.
on the iOS or iPadOS device that you’ll use for testing.
Open your email invitation or tap the public link on your device.
When installing via email invitation, tap “View in TestFlight” or “Start testing” then tap “Install” or “Update” for the app you want to test.
When installing via public link, tap “Install” or “Update”.
on the Mac that you’ll use for testing.
Open your email invitation or click the public link on your Mac.
When installing via email invitation, click “View in TestFlight” or “Start testing” then click “Install” or “Update” for the app you want to test.
When installing via public link, click “Install” or “Update”.
Create a group and add up to 100 (App Store Connect users with access to your content) to test your app using . You can choose to automatically distribute builds to internal groups or add them manually. Builds created by Xcode Cloud always need to be manually added to groups in App Store Connect.
Required role: , , , , or . See .
From My Apps, select your app.
Click the TestFlight tab.
In the sidebar, click the Add button (+) next to Internal Testing.
In the dialog that appears, enter the name for a new internal group, then click Create. You can change the name later, if needed.
Select the “Enable automatic distribution” checkbox to allow Xcode to automatically deliver builds to everyone in the group. If automatic distribution is not enabled, all builds must be manually added to the group. Builds created by Xcode Cloud always need to be manually added to groups in App Store Connect.
From My Apps, select your app.
Click the TestFlight tab.
In the sidebar, click the Add button (+) next to Internal Testing.
Next to Testers, click the Add button (+).
If you have builds available for testing, the users you select will receive an email inviting them to test the app. They’ll be directed to accept the invitation using the app on their device or via a redemption code. Internal testers can download and test all builds for 90 days.
From My Apps, select your app.
Click the TestFlight tab.
In the sidebar, click the group you want to add a build to.
On the right, click the Add button (+) next to Builds.
If you have builds available for testing, the users you selected will receive an email inviting them to test the app. The users will be directed to accept the invitation using the app on their device or via a redemption code. Internal testers will be able to download and test all builds for 90 days.
You can invite (persons outside your team) to test your app using once you’ve uploaded at least one build. To make your build available for external testing, create a group, add builds, and then invite testers using their email address or by sharing a public invitation link.
Required role: , , or . See .
From My Apps, select your app.
Click the TestFlight tab.
In the sidebar, click the Add button (+) next to External Testing to add a new group.
In the dialog that appears, enter a group name, then click Create.
From My Apps, select your app.
Click the TestFlight tab.
In the sidebar, under External Testing, select the group you want to add builds to.
On the right, click the Add button (+) next to Builds.
After you submit your build to TestFlight App Review, Apple reviews the build and the accompanying . The first build you submit requires a full review, but later builds for the same version may not.
If Apple approves your build for TestFlight beta testing, users on the App Store Connect account with the Admin role will receive an email notifying them of the approval.
If Apple rejects your build or metadata, the external status will be Rejected and you can click status to see rejection details.
Note: Submitting a build to TestFlight App Review doesn’t submit it to App Review for sale in the App Store.
Once you have builds available to test, and you've added them to a group, you can invite testers.
From My Apps, select your app.
Click the TestFlight tab.
In the sidebar, under Testers & Groups, select a group.
You can Invite testers using a public link, email, or both.
To invite testers using a public link:
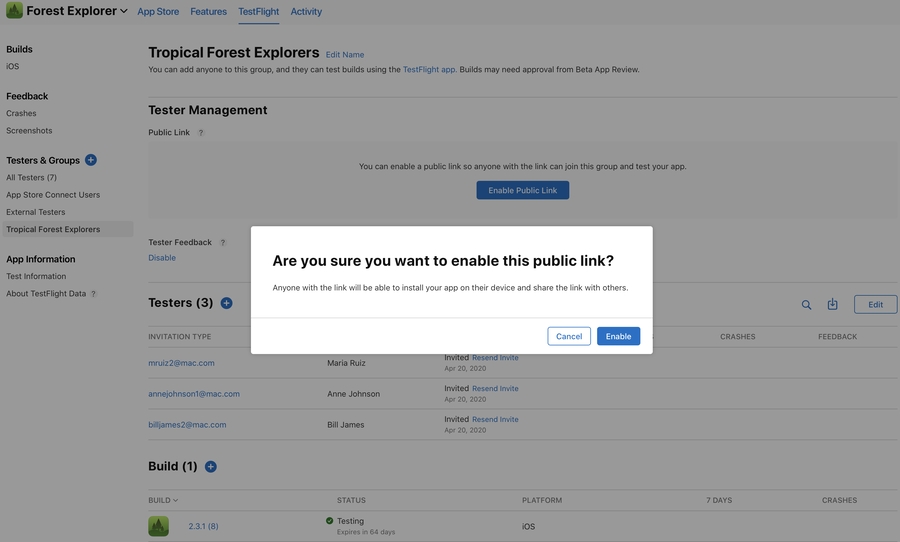
1. Click Enable Public Link, and confirm in the dialog that appears.
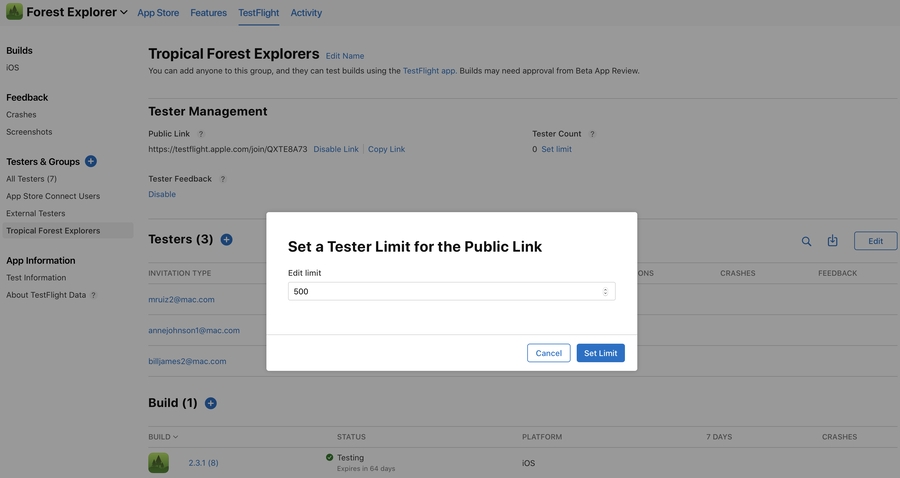
2. Under Tester Count, click Set Limit to limit the number of testers that can join this testing group using the public link. Enter a number between 1 and 10,000.
3. Copy the link, and share it using social media, messages, email, or other channel.
Keep in mind that anyone can share this link, so testers may be able to join your testing group even if you don't invite them directly. If a tester joins your group using a public link, their name and email will not be displayed in the Testers section in App Store Connect (it will display as anonymous), but you will be able to see their installation date, sessions, and crashes. You can disable the public link at any time.
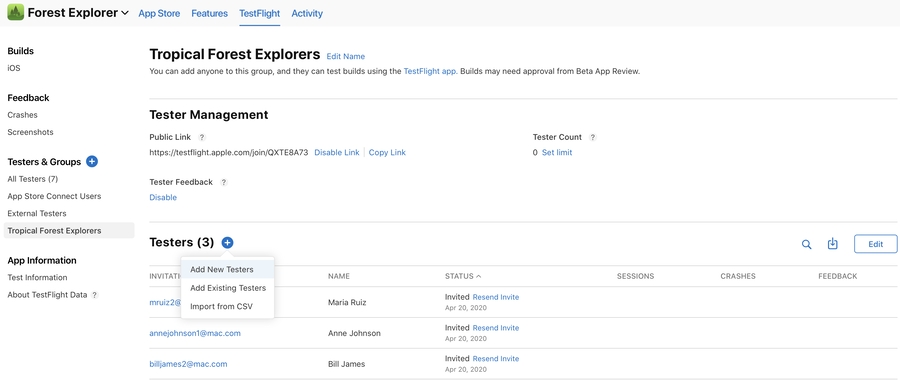
1. Click the Add button (+) next to Testers.
2. In the pop-up menu that appears, choose an option. You can add new testers using their emails address, existing testers you've previously added, or import testers from a CSV file.
3. Testers you invite will get an invitation email to start testing. If a tester accepts an email invitation, their name, email address, installation date, sessions, and crashes, will display in the Testers section in App Store Connect.
If you didn’t select “Automatically notify testers” when you added your build to your group, you must manually notify testers when your build is approved.
From My Apps, select your app.
Click the TestFlight tab.
In the sidebar, under Builds, click the platform for your app (iOS or tvOS).
Choose a version, then under Status, click Notify Testers for the build row.
The changes to Testing. The external testers will receive a notification directing them to accept the invitation using the TestFlight app on their device.
From My Apps, select your app.
Click the TestFlight tab.
In the sidebar, under Testers &Groups, select a group.
On the right, under Builds, hover over the build you want to remove.
If you want to remove a build from testing for all your testers, go to .
After installing TestFlight 3 or later for iOS, iPadOS, or tvOS, or TestFlight for macOS, you’ll be prompted to turn on automatic updates. This allows the latest available beta builds to install automatically. TestFlight will notify you each time a new build is installed on your device. Automatic updates can be turned off at any time.
Note: This setting will apply to all new beta app builds. Beta apps that have automatic updates set at the individual app level won't be affected
TestFlight for iOS or iPadOS
Open TestFlight and tap Settings in the top right.
Tap Automatic Updates.
Tap On or Off.
TestFlight for macOS
Open TestFlight and choose Preferences from the TestFlight menu.
Under General, select Automatic Updates for New Apps.
TestFlight for iOS or iPadOS
Open TestFlight and go to the app’s page.
Under App Information, turn Automatic Updates On or Off.
TestFlight for macOS
Open TestFlight and go to the app’s page.
Under App Settings, select Automatic Updates.
When viewing an app in TestFlight, you'll see the latest available build by default. You can still test all other builds that are available to you.
If you already have the App Store version of the app installed on your device, the beta version of the app will replace it. After you download the beta app, you’ll see an orange dot next to its name that identifies it as a beta.
When you accept a TestFlight invitation through a public link, your name and email address aren’t visible to the developer. However, they’ll be able to see your number of sessions and crashes, the day you installed their app, and the latest installed version.
Open TestFlight and go to the app’s page.
Tap View Previous Builds or, if you're using Xcode Cloud, tap Versions and Build Groups.
Tap either the Versions tab or Build Groups tab, then tap and install the build you want to test. The build you choose will replace what's currently installed.
Open TestFlight and go to the app’s page.
Next to Build Information, click View Previous Builds or, if you're using Xcode Cloud, click Versions and Build Groups.
Click either the Versions or Build Groups tab, then select and install the build you want to test. The build you choose will replace what’s currently installed.
While testing a beta version of an app or App Clip, you can send the developer feedback about issues you experience, or make suggestions for improvements based on the “What to Test” content. Feedback you submit through TestFlight is also provided to Apple as part of the TestFlight service.
You can send feedback through the TestFlight app or directly from the beta app or beta App Clip by taking a screenshot, and you can report a crash after it occurs. If you were invited to test an app with a public link, you can choose not to provide your email address or other personal information to the developer. Apple will also receive all feedback you submit and will be able to tie it to your Apple ID.
For iOS or iPadOS:
Open the TestFlight app on your device.
From the Apps list, tap the app.
Tap Send Beta Feedback.
In the share dialog, tap Include Screenshot to choose a screenshot. If you don’t want to send an attachment, tap Don't Include Screenshot.
For iOS 12.4 or earlier:
If your device is running iOS 12.4 or earlier, tap Send Beta Feedback to compose an email to the developer. The feedback email contains detailed information about the beta app and about your iOS device. You can also provide additional information, such as necessary screenshots and steps required to reproduce any issues. Your email address will be visible to the developer when you send email feedback through the TestFlight app even if you were invited through a public link.
For macOS:
Open the TestFlight app on your Mac.
From the Apps list in the sidebar, select the app you want to send feedback for.
Click Send Beta Feedback.
In the feedback dialog that appears, add your comments (up to 4,000 characters), and optionally enter your email address if you were invited with a public link.
Note: You can drag and drop screenshots into the feedback text field.
When you take a screenshot while testing a beta app or beta App Clip, you can send the screenshot with feedback directly to the developer without leaving the app or App Clip Experience. Developers can opt out of receiving this type of feedback, so this option is only available if the developer has it enabled.
For iOS or iPadOS:
Take a screenshot on your device. For details on how to take screenshots, see , , and .
A thumbnail of your screenshot appears in the lower-left corner of your device. Tap the thumbnail and, if needed, add drawings and text with . Then tap Done.
Tap Share Beta Feedback.
For macOS:
Take a screenshot on your Mac. For details on how to take screenshots, visit
A thumbnail of your screenshot appears in the lower-right corner of your Mac. Click the thumbnail to open the window and, if needed, add drawings and text with .
From the Share menu in the Quick Look window, click Send Beta Feedback.
If you experience a crash while testing a beta app or beta App Clip, you’ll receive an alert asking if you want to send crash details to the developer through TestFlight. Developers can opt out of receiving this type of feedback, so this option is only available if the developer has it enabled.
When a crash alert displays for TestFlight for iOS or iPadOS, tap Share, add any additional comments, then tap Submit.
When a crash alert displays for TestFlight for macOS, click Report, add any additional comments, then click OK, Send, or Reopen.
To provide feedback on a tvOS app, open TestFlight, go to app’s page, go to the Information section to view the developer's email address, and send them an email. Provide as much information as you can, including screenshots and steps required to reproduce any issues you encountered. Please note that your email address will be visible to the developer when you send email feedback through TestFlight.
If you need to contact the developer while you’re testing their beta app for reasons other than feedback, you can view their email address. In TestFlight, go to the app’s page, go to the Information section, and tap App Details to view the developer’s email address.
If you don’t accept your email invitation, the beta app will not be installed and Apple will not send you any further communications regarding testing. If you accepted the invitation but no longer wish to test the app, you can delete yourself as a tester on the app’s Information page in TestFlight by tapping Stop Testing. Alternatively, you can email the developer to ask them to remove you by clicking the Unsubscribe link at the bottom of a TestFlight build notification email.
When you test beta apps or beta App Clips with TestFlight, Apple will collect and send crash logs, your personal information such as name and email address, usage information, and any feedback you submit to the developer. Information that is emailed to the developer directly is not shared with Apple. The developer is permitted to use this information only to improve their app and is not permitted to share it with a third party. Apple may use this information to improve the TestFlight app.
Apple retains TestFlight data for one year. To view and manage your data with Apple, including your data that is sent to Apple through TestFlight, visit . For more information about how the developer handles your data, consult their privacy policy. To request access to or deletion of your TestFlight data, contact the developer directly.
The following data is collected by Apple and shared with the developer when you use TestFlight. If you accepted an invitation through a public link only, your email address and name are not visible to the developer.
When you send feedback through TestFlight or send crash reports or screenshots from the beta app, the following additional information is shared. This information is collected by Apple and shared with developers. Apple retains the data for one year.
Copyright © 2022 Apple Inc. All rights reserved.
Note: If a user you want to add doesn’t appear, change their user role.
Select the checkbox next to each user you want to invite, then click Add.
Select the build you want to add to the group, then click Next.
Enter the What to Test information and optionally enter localized versions of test information in the fields under each language-specific section.
Note: This information will be available to testers in all groups that have access to the build.
Click Add.
In the build dialog, select the platform and version from the pop-up menus.
From the table, select a build, then click Next.
Although you can add only one build at a time, you can add additional builds later.
Note: Enter test information such as Feedback Email and Contact Information if these details have not yet been provided in the Test information dialog.
In the What to Test dialog, enter what you want testers to focus on.
Optionally, enter localized versions of testing information in the text fields under each language-specific section.
Optionally, select “Automatically notify testers.”
If you leave this checkbox deselected, you will have to manually distribute the build to testers after it's approved by TestFlight App Review later.
Depending on the status of the build, click either Submit Review or Start Testing.
You can only have one build of each version in review at a time. Once that build is approved, you can submit additional builds.
Click the delete button.
In the dialog that appears, confirm you want to remove the build from the group and click Remove.
Add your comments (up to 4,000 characters), and optionally enter your email address if you were invited with a public link.
Tap Submit.
Optionally, attach a screenshot by clicking Attach Screenshot.
Click Submit.
Tap Submit.
Click Submit.
The number of times you've used a beta build.
Crashes
The number of crashes per beta build.
The version of macOS your device is running.
Language
Your device language.
Carrier
Your wireless service provider.
Time Zone
The time zone your device is set to.
Architecture
The type of Central Processing Unit (CPU) for your device.
Connection Type
Whether you were connected to Wi-Fi, cellular, or not connected at the time that the feedback was sent, and your network type.
Paired Apple Watch
The model and watchOS version of the paired Apple Watch, if applicable.
Screenshots
The screenshots you shared when providing feedback.
Comments
The comments you shared when providing feedback.
App Uptime
The length of time the app was open and running at the time the feedback was sent.
Disk Free
The amount of disk space you had available when you sent feedback.
Battery
Your battery level at the time the feedback was sent.
Screen Resolution
The screen resolution of your device.
Crash Logs
Symbolicated crash logs. This includes information about how long the app was running before it crashed.
Email Address
The email address with which you were invited to test the app. This may or may not be the same as the Apple ID associated with your device. If you were invited with a public link, your email address is not shared with the developer.
Name
Your first and last name as entered by the developer when they invited you to test the app using your email address. If you were invited with a public link, your name is not shared with the developer.
Invitation Type
Whether you were invited by email or through a public link.
Status
The status of your invitation: Invited, Accepted, or Installed. This status is refreshed when you accept or install a beta build.
Installs
The number of times you've installed a beta build.
App Name
The name of the app you are testing.
App Version
The most recent version and build that you have access to. This is the number that displays under the app name in the list of apps in TestFlight.
Installed App Version
The version and build you have installed on your device.
Device
The model of your device.
iOS Version
The version of iOS your device is running.

Sessions
macOS Version